When most people think about hiking in Aotearoa, New Zealand, the first day hike that comes to mind is Tongariro Alpine Crossing. The most popular hike in all of New Zealand and widely considered the best day walk in the country. With such popularity, you can only imagine how busy this hike is. Come during the height of peak season, and you could be one of up to 2000 people taking on the hike on any given day.
So why would you do a hike that is so busy when there are countless quiet day hikes on offer in New Zealand?
Whilst some other day hikes come close to rivalling the views of the Tongariro Alpine Crossing, nothing can truly compare to this rugged volcanic landscape full of steaming vents, neon bright lakes, old lava flows and deep red craters.
Come towards the end of the season and there will still be plenty of people, but not quite as many as during summer. Once you get on the trail you’ll find the crowds disperse a little and it’s still easy to take in the majestic beauty on offer all around you!
Be sure to check out our Instagram to see more of our favourite day hikes around Aotearoa!

We didn’t have high expectations for this hike given its popularity and how busy we knew it would be even in the tail end of the season. We thought we would enjoy the hike, but that the crowds would make it difficult to fully appreciate the landscape.
When we started out on the trail, there was a steady stream of hikers in front and behind us. We had visions that the entire 20kms would be just like this, and we were dreading it. However, once we started walking a bit and especially after we peeled off to the first side track, the crowds thinned out.
Everyone walks at a difference pace and that became really obvious as we continued along the track. Whilst there were still people around, it wasn’t as hectic as the first few kms were, and we found it much easier to enjoy the hike.
Details
Starting Point: Mangatepopo Road Carpark
Distance: 23.5kms if you take the odd side trail off the main track like we did.
Duration: The hike took us 8hrs to complete, including stops.
Difficulty: Moderate – Hard. This is alpine terrain and a long hike. Make sure you are suitably prepared! If you aren’t used to this type of hike, consider doing a guided hike.
When: We did this hike at the end of April, it was cold and a little icy in shaded areas, but there was no snow on the track. We were super lucky to get clear skies and very little wind for the entirety of the day, too!
Local Iwi: Ngāti Tuwharetoa
Local hapū: Ngāti Hikairo ki Tongariro
Additional Information: This is a very sacred area, so please be aware of signs informing you of how to show respect whilst on the trail. At especially sacred points along the track, it is respectful to refrain from eating. We make note of these locations below, along with including the best spots to stop for food.
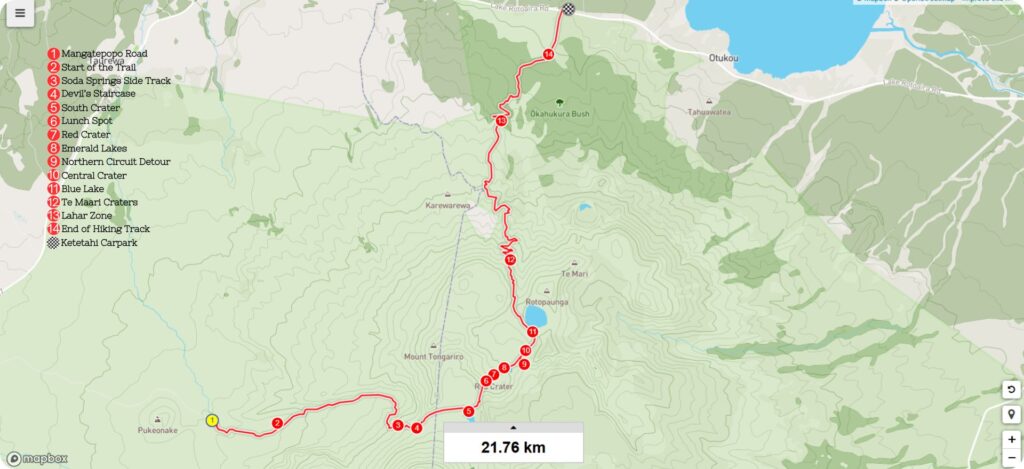
Trail Map
Getting to the Starting Point of Tongariro Alpine Crossing
Make sure you book a shuttle service to get you to the start of the track. The parking at the start of the trail has a 4hr time limit. Given that it’s a point-to-point hike, you’ll need a ride at the end regardless of where you park.
There are plenty of shuttle services to choose from. We opted to use Tongariro Shuttle as it was the only option that provided parking at the end of the trail in a secure parking area. This way we could finish the trail on our own time without having to worry about making it to the end in time for a return shuttle. It was a great way to start the day too, all the staff were super friendly and our bus driver welcomed us to the land and told us a little about this special place.
In addition to booking your shuttle service, you’ll need to book a spot on the trail here. This is to help stop the trail from getting overwhelmed with visitors on any given day and to keep everyone on the trail safe. It is free to book, but you must have a booking to be able to start the hike. It’s much easier to do this beforehand than to have to do it with limited signal at the start of the trail.
The Trail
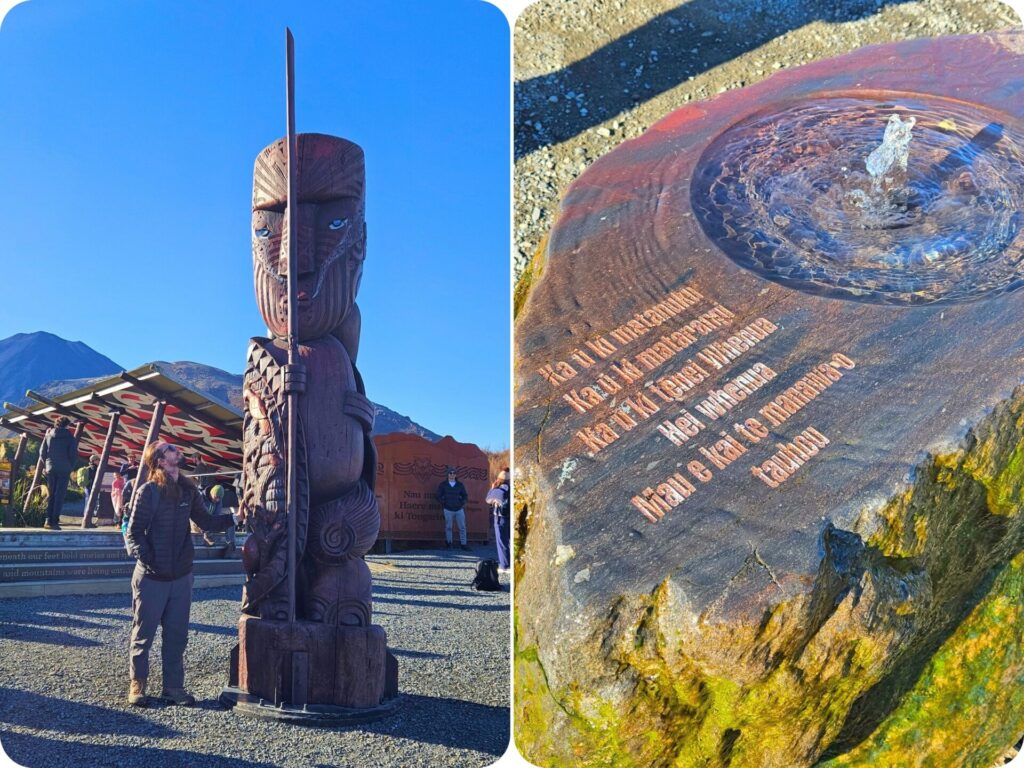
Once you get dropped off at the Mangatepopo carpark, use the toilets provided if you need to, as you won’t see any for a good few kms into the hike. Then give yourself some time reading the information boards and admiring the beautiful pou whenua (wooden carving) before starting on your epic hike.
Taking your time at the start lets the crowds disperse a little so you have a bit more space when you first start out on the track. Don’t get me wrong, it will still be busy, but you won’t be in the thick of the first people eagerly trying to start the hike.
You have plenty of time in the day, so make the most of it!
Start of the Trail
Once you show your booking to the person manning the trail head, you are good to go! Just as you step onto the track, you’ll see a little sign and this lovely carved spring. Have a read of the sign and cleanse your hands and really reflect on the journey you are about to take.
It’s such a privilege to be welcomed onto this land, to experience the vast scale and presence of the Maunga (mountains) that call this place home. The hike ahead won’t be easy, but it will be rewarding; with memories you won’t soon forget.
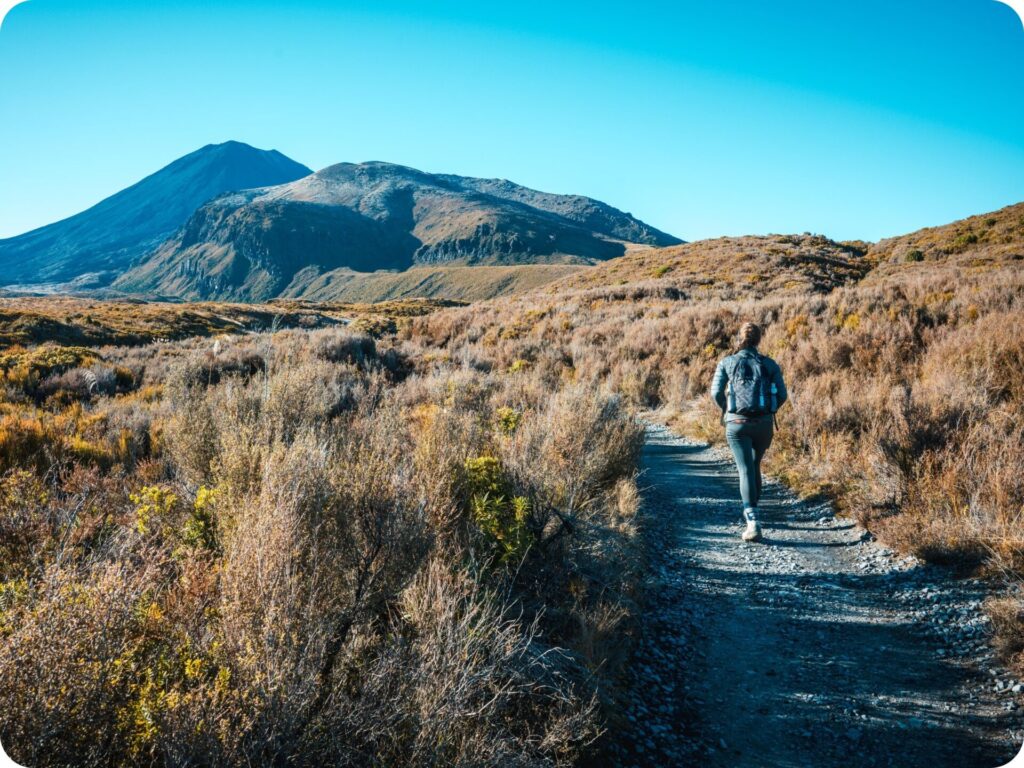
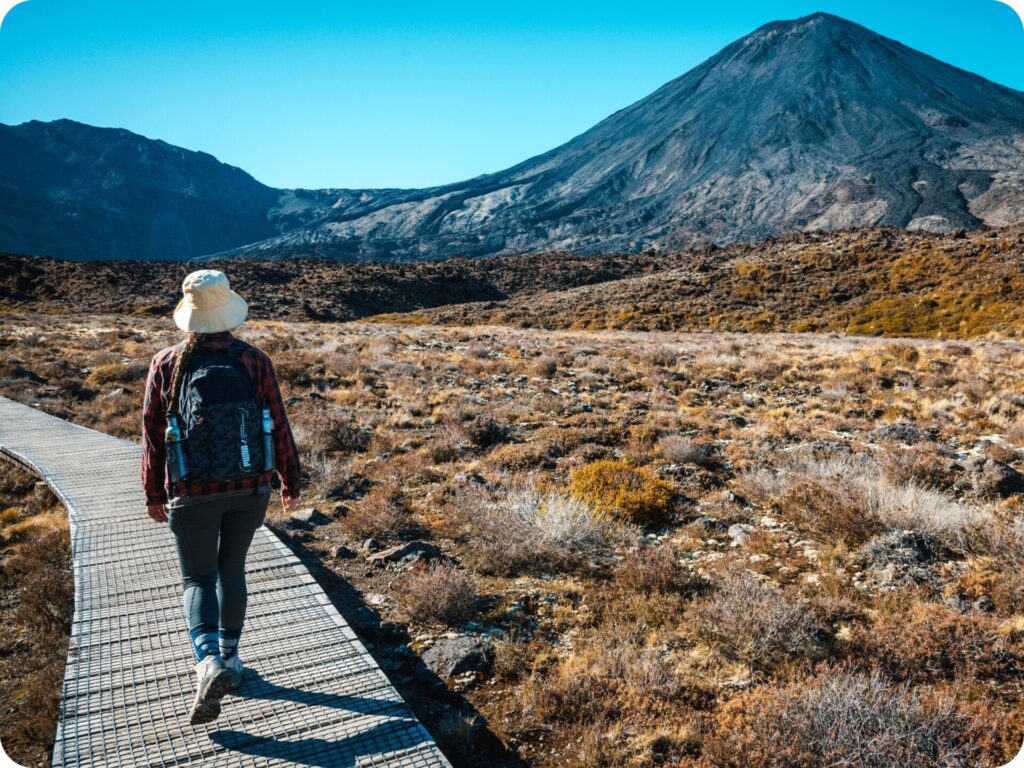
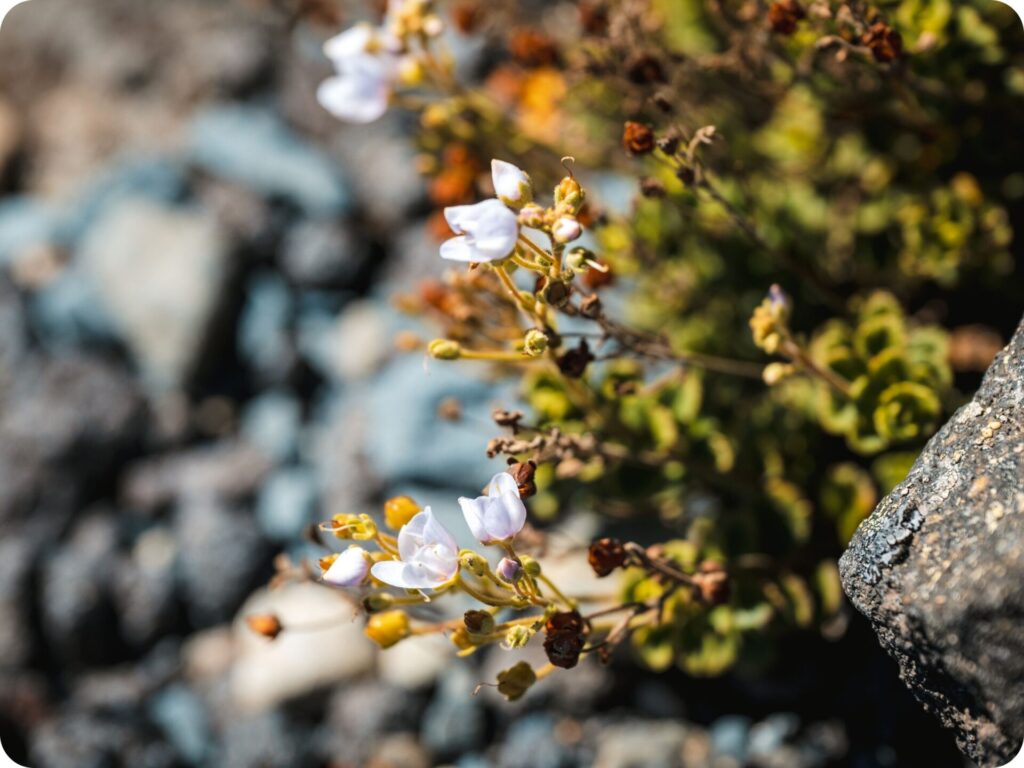
The track starts off relatively flat before a small climb through Mangatepopo valley. You’ll have views of Mt Tongariro and Mt Ngauruhoe in front of you, and on a clear day views out to Mt Taranaki behind you. Stay on the boardwalk when it appears,, as it is here to keep the fragile landscape safe from footprints. You’ll soon reach the top of the short climb, with some incredible rock formations from an old lava flow.
Soda Springs Side Track
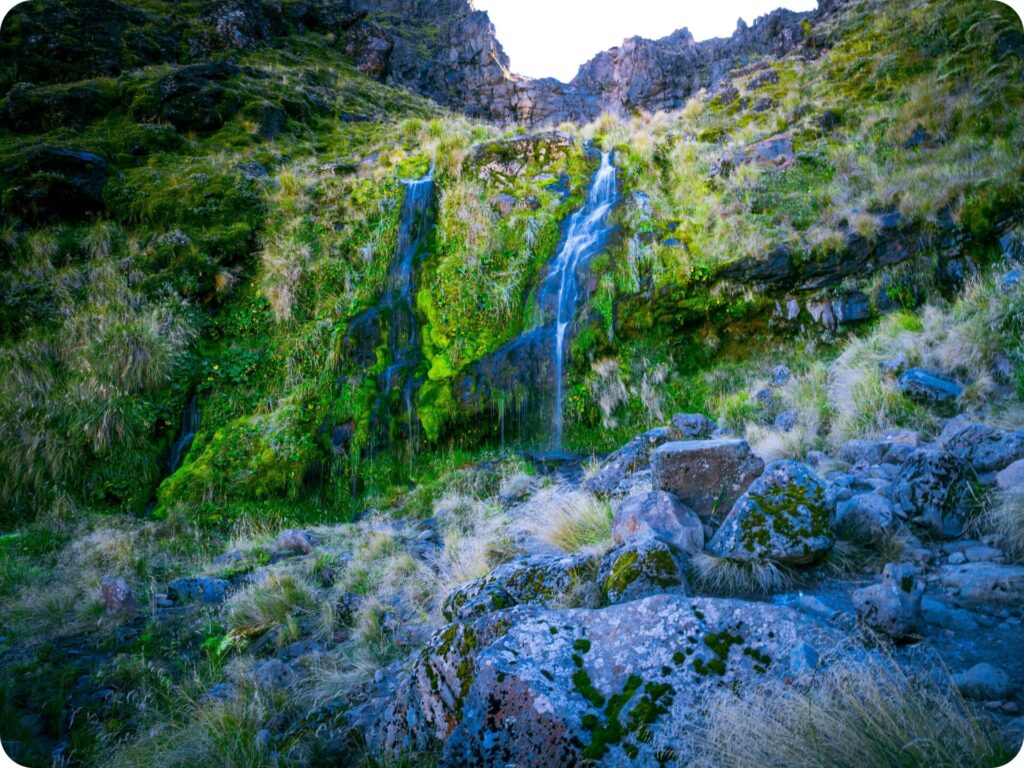
After crossing the lava flow area, you’ll come to a fork in the trail. Take the track to the left, which is a short detour taking you to the base of Soda Springs. The cold springs create a lush green wall in the otherwise arid brown landscape.
It’s a beautiful place to stop and take in the crisp morning air whilst you listen to the splash of the waterfall on the rocks. We chose a little spot away from the path and the water to have our breakfast here, whilst listening to the water bubbling away.
Devil’s Staircase
Once you’ve enjoyed the waterfall, follow your steps back to the main trail and get ready for the first real climb! After a short little incline, you’ll come across the first set of toilets on the trail. From here, the ascent increases steadily upwards until you find yourself face to face with some lovely stairs dubbed by trail goers as the ‘Devil’s Staircase’.
It’s a brutal climb, but it doesn’t last too long. You’ll soon find yourself at the top of the saddle between Mt Ngauruhoe and Mt Tongariro. Be sure to stop along the way and look behind you for some incredible views out to Mt Taranaki. We were so lucky to have a clear day with astounding views of Taranaki. It’s pretty incredible to be able to see all 3 mountains from one spot.
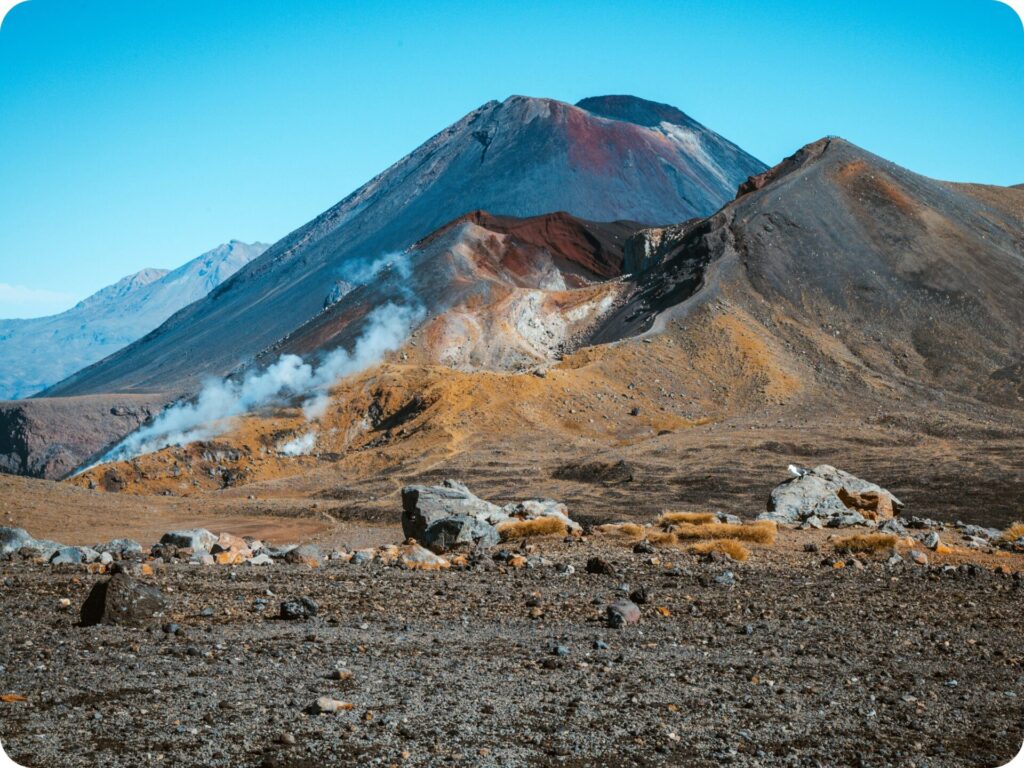
Mt Ngauruhoe
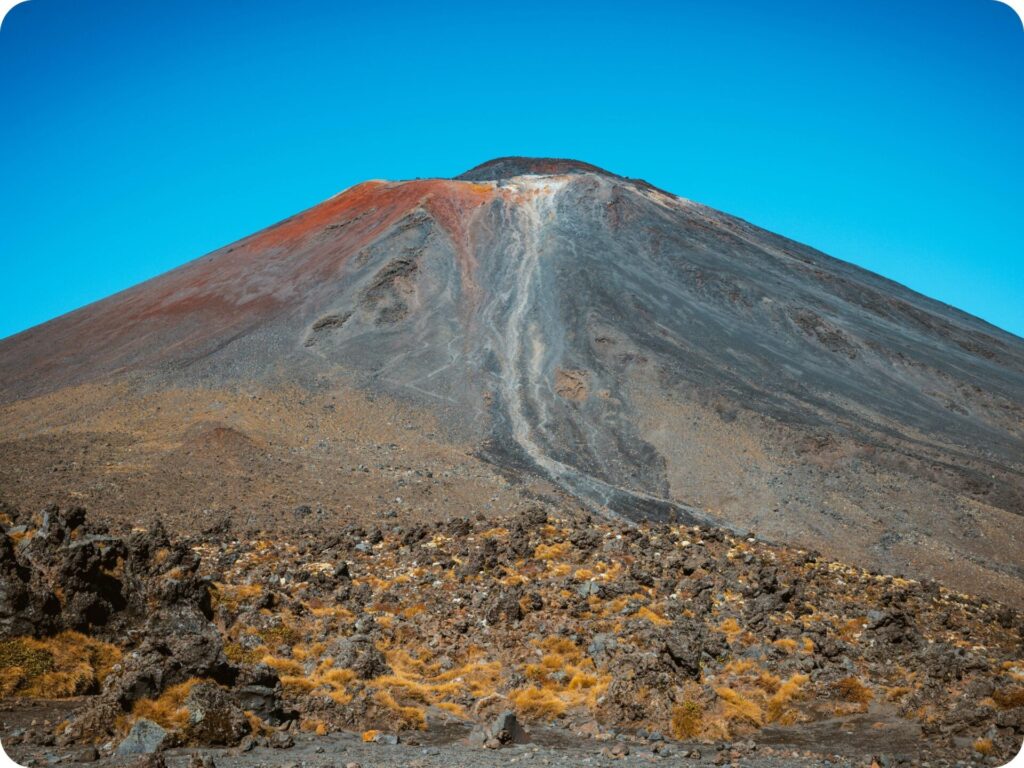
After climbing up and over the saddle, you’ll find yourself in the best position to admire Mt Ngauruhoe from the impossibly flat ground of South Crater. There are another set of toilets just as you leave the saddle here. You may also notice a few people appearing to leave the Tongariro Alpine Crossing trail and heading towards Mt Ngauruhoe.
Whilst there is technically a trail to the summit of Ngauruhoe trail markers have been removed as it a culturally significant Maunga. Ngāti Hikairo ki Tongariro ask that people don’t summit the mountain out of respect towards their ancestor Ngauruhoe.
When you are standing below the Maunga, looking up at its impressive and imposing force, it is very easy to feel how important this Maunga is, and to respect this request. Ngauruhoe is an ancestor to Ngāti Hikairo ki Tongariro and a powerful link to their past.
All the Maunga in the Tongariro National Park are sacred, and thus the request not to summit Ngauruhoe is extended to Tongariro and Ruapehu as well. The Summit is the most sacred part of a Maunga as it the ‘head’ of the ancestor. This is why we don’t summit mountains at all in Aotearoa. Out of respect to the local iwi in whichever part of the country we happen to be in at the time. So admire this Maunga from afar, and please stick to the Tongariro Alpine Crossing trail whilst doing so.
South Crater

South Crater is where you truly start to experience the volcanic aspect of the hike. You’ll start by walking across the crater, which feels almost never ending in its flat, barren landscape.
Depending on the weather conditions this can be a dry baked walk, or a rather sloppy muddy one. We had the later version, and had to be careful not to slip over in the mud! The flat walk is made even more pronounced by the presence of Tongariro on your left and Ngauruhoe on your right.
Stick to the trail and chose the right-hand trail when you reach the fork to get some cool views of the lake beneath Ngauruhoe. This little side trail will meet back up with the main one before starting the short climb up and out of south crater.
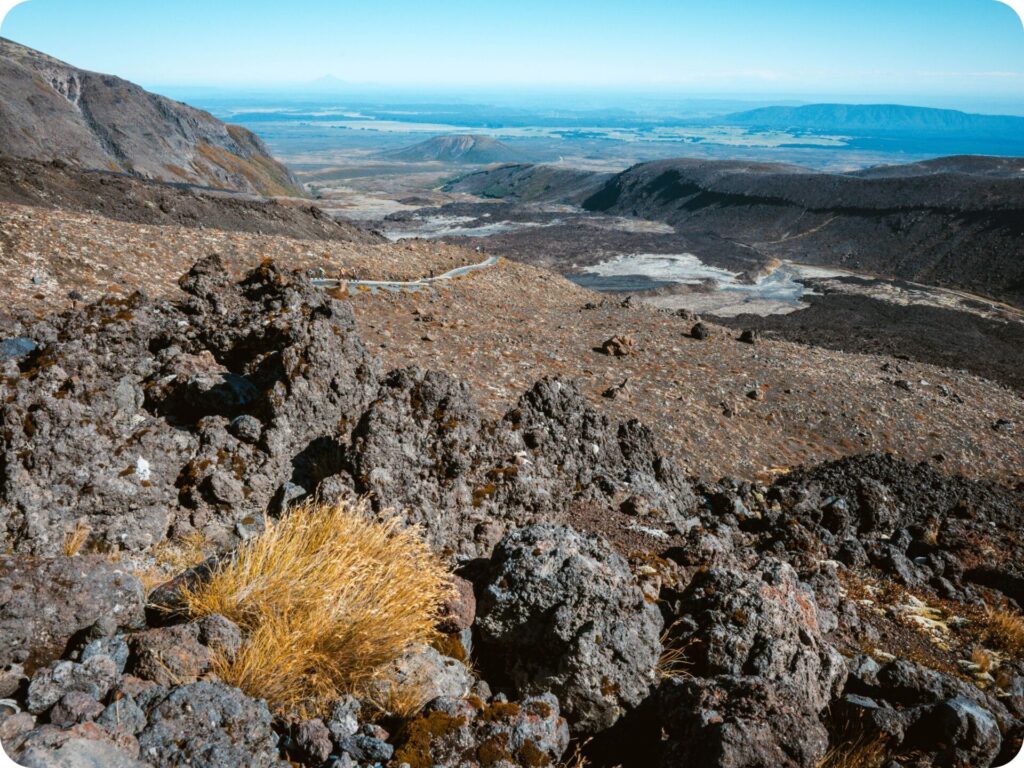
The Perfect Lunch Spot
You’ll emerge from South Crater to stunning views over Oturere Valley. A volcanic valley of vast dessert like terrain with rocks and little to no green bush stretching out as far as the eye can see.
From here, you have a choice to make. Eat your lunch here before tackling the steepest part of the climb, or take on the climb and eat lunch at the top. Most people, including us, choose to take on the climb and be rewarded with lunch at the top. It’s a bit of a scramble over rocks and a rather steep climb to get to the top of the Red Crater ridge.
It’s well worth the effort to see the gash of red clawed out of the landscape. The trail continues along the lip of Red Crater but stop at the first crest for some lunch first before finishing the more gentle part of the climb to the top.
Red Crater
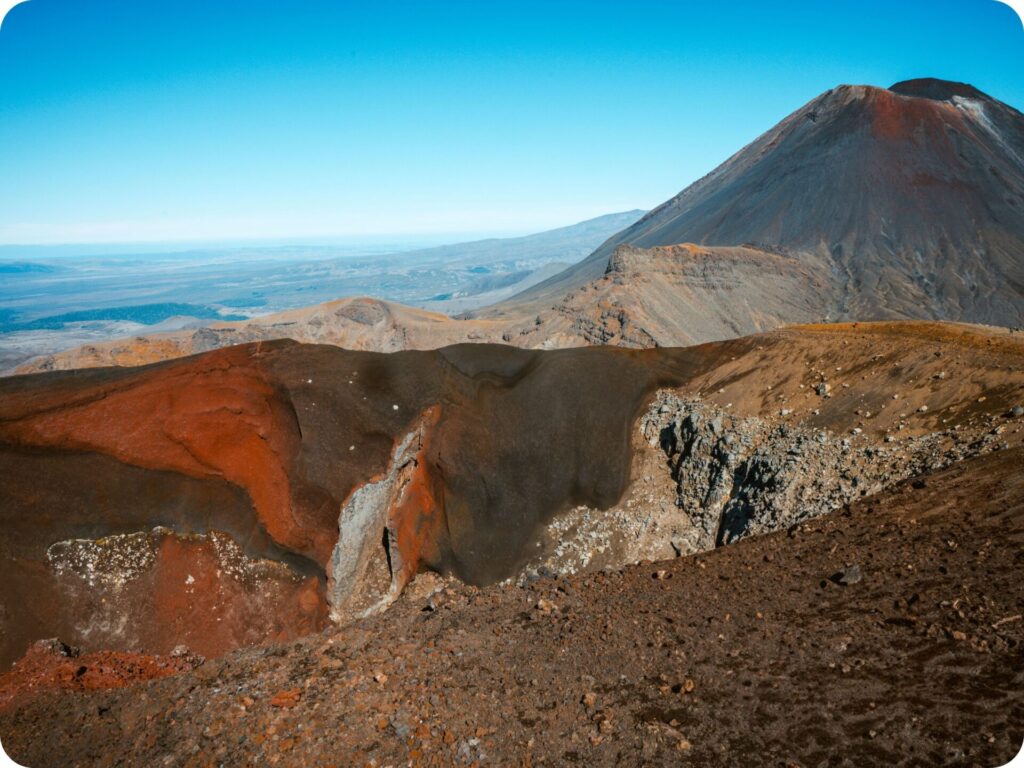
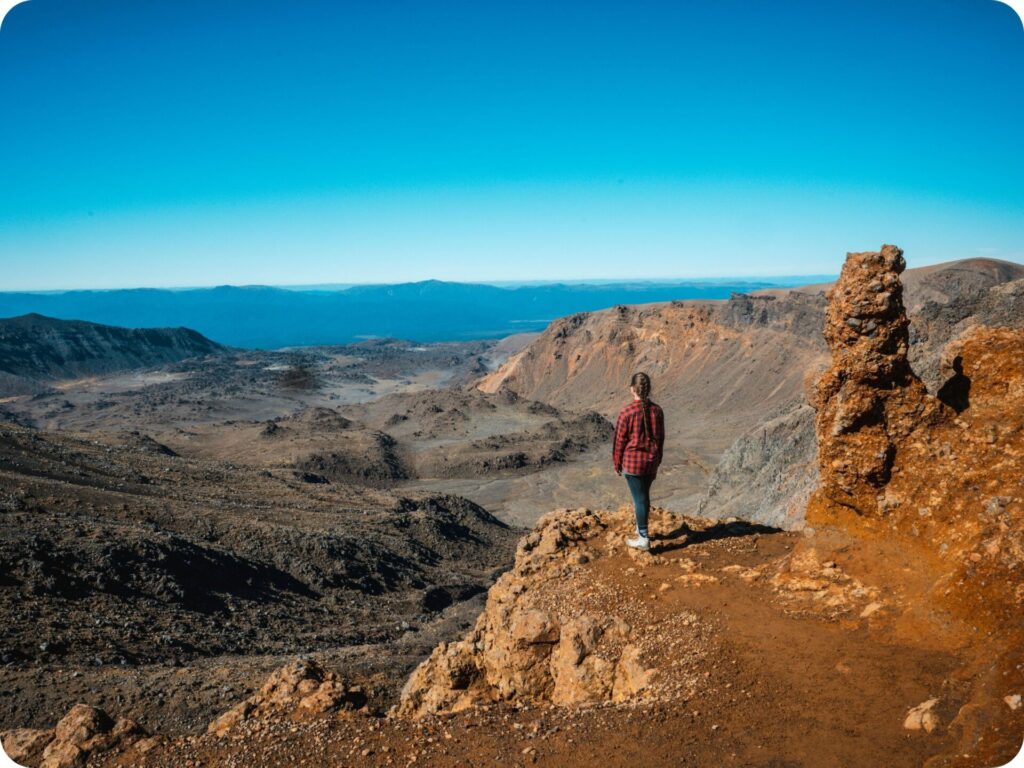
Once you’ve refuelled, follow the lip of Red Crater around and then up for your final push to the top. You’ll come across a cairn here (a rock stack marker) signalling it’s the highest point on the track at 1886m above sea level.
You get the most impressive views of red crater from here, with Ngauruhoe providing an incredible backdrop. Turn around and walk a few steps to be greeted with the bluest water you’ve ever seen in the lakes studded in the volcanic hillside below you.
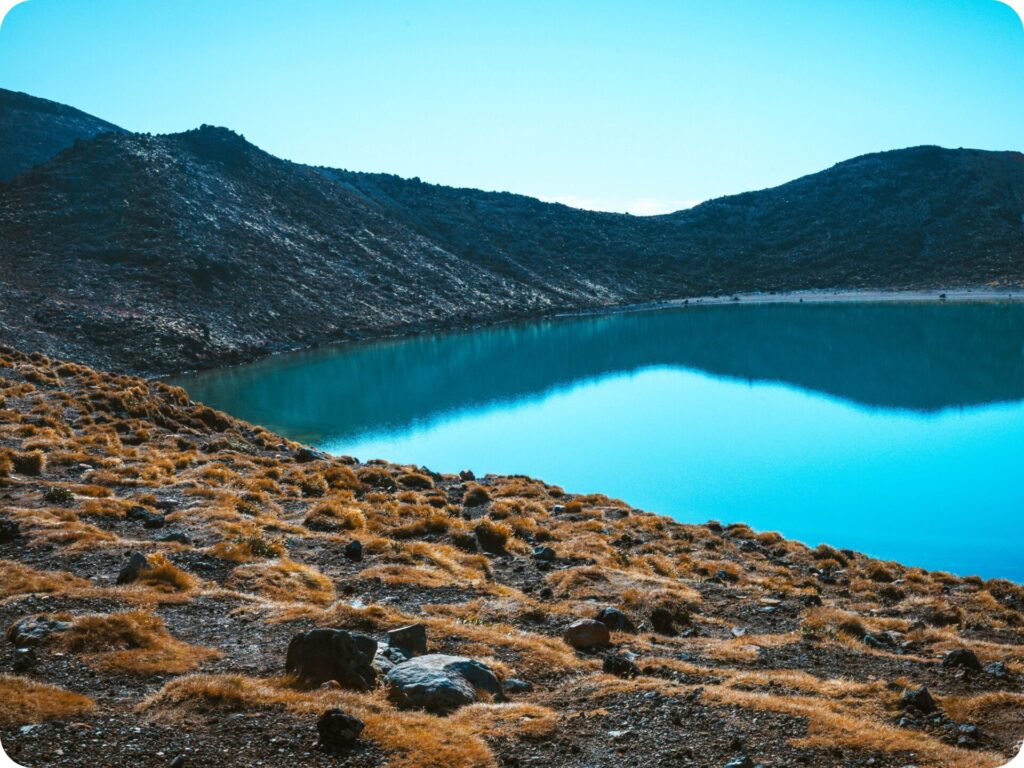
Ngarotopounamu (Emerald Lakes)
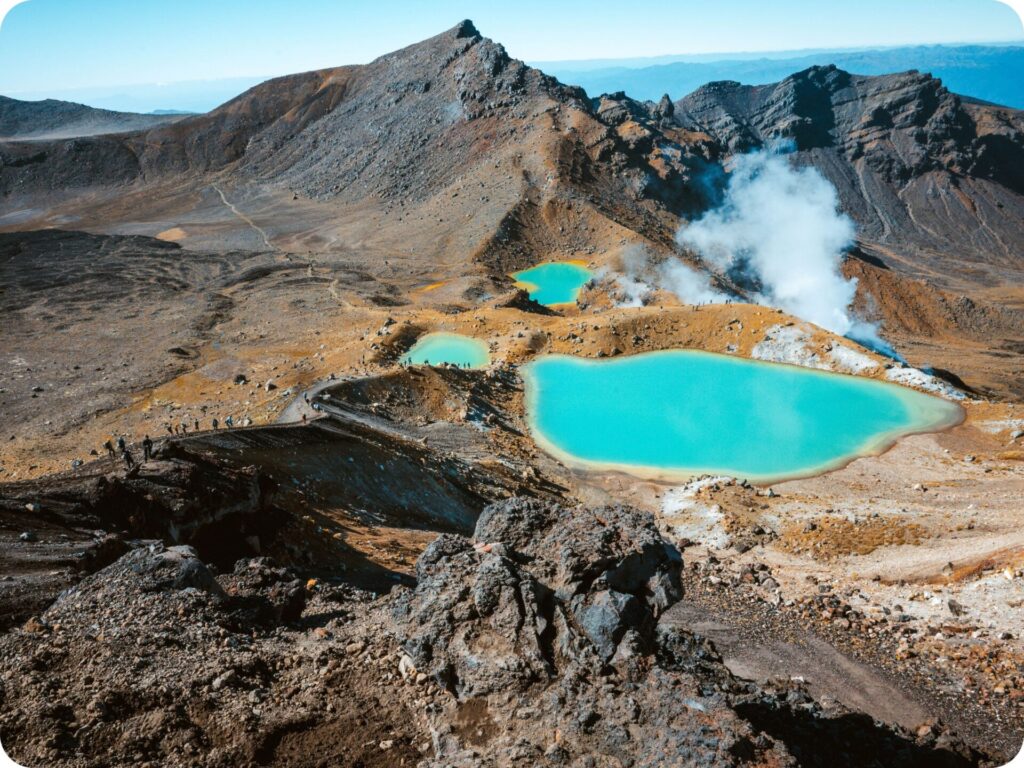
The aptly named Ngarotopounamu Lakes really look like a giant has scattered a few precious gems in the arid terrain below. The name translates to greenstone hued lakes. From your Bird’s Eye view over these lakes, you can see the volcanic steam rising from vents in the earth without having to smell the sulphur of the lakes themselves. On a clear day, you’ll be able to see all the way out to Blue Lake as well.
Take it all in from above before starting your scramble down the steep and loose gravel side of Red Crater. It’s a little like skiing down the side of the mountain, just with loose dirt instead of snow. Take it easy and allow the slide of the gravel to assist you in what we called a ‘controlled slide’ down the mountain, instead of resisting the movement that’s going to happen anyway.
Once you get down to the first two of the lakes, you’ll get a full on sensory experience with the stunning colour of the likes, the sounds of the steam vents gushing, the smell of the sulphur and even a slight taste of sulphur on the air. The only sense you won’t be using is that of touch.
The lakes are tapu (sacred) and we are all asked to refrain from touching them. Eating here is also discouraged due to the tapu nature of the lakes. Stick to the trail here to protect the fragile area, and to keep yourself safe (it is an active volcanic site). You’ll still get amazing views without wandering off the trail.
Northern Circuit Detour
The track will continue to take you down past the third of these striking lakes. If you do feel the need to view them a little closer, this is your chance to get close to the third lake without leaving any designated walking tracks.
When you reach the track junction with the Tongariro Northern Circuit trail, follow the northern circuit to the right, where the trail takes you around and to the shores of the third and biggest of the lakes.
It’s well worth the detour to follow this track to the end of the lake. Not only do you get a view of the lake up close, you also get one with far fewer people. Looking up at the other two lakes from this vantage point with the arid rock and steam vents gives you an entirely new perspective on this blue water just sitting in a volcanic desert.
Central Crater
Retrace your steps back to the Tongariro Alpine Crossing track, and you’ll find yourself walking through another flat stretch of land, Central Crater. Far rockier than South Crater and with a huge black flow of lava stretching out across the floor.
The lava flow is the most impressive from the elevated shores of Blue Lake. Or if you need an excuse to stop on the climb up to these shores, look behind you to see the oozing flow (now solid but it’s hard not envision it still inching forward) of black lava.
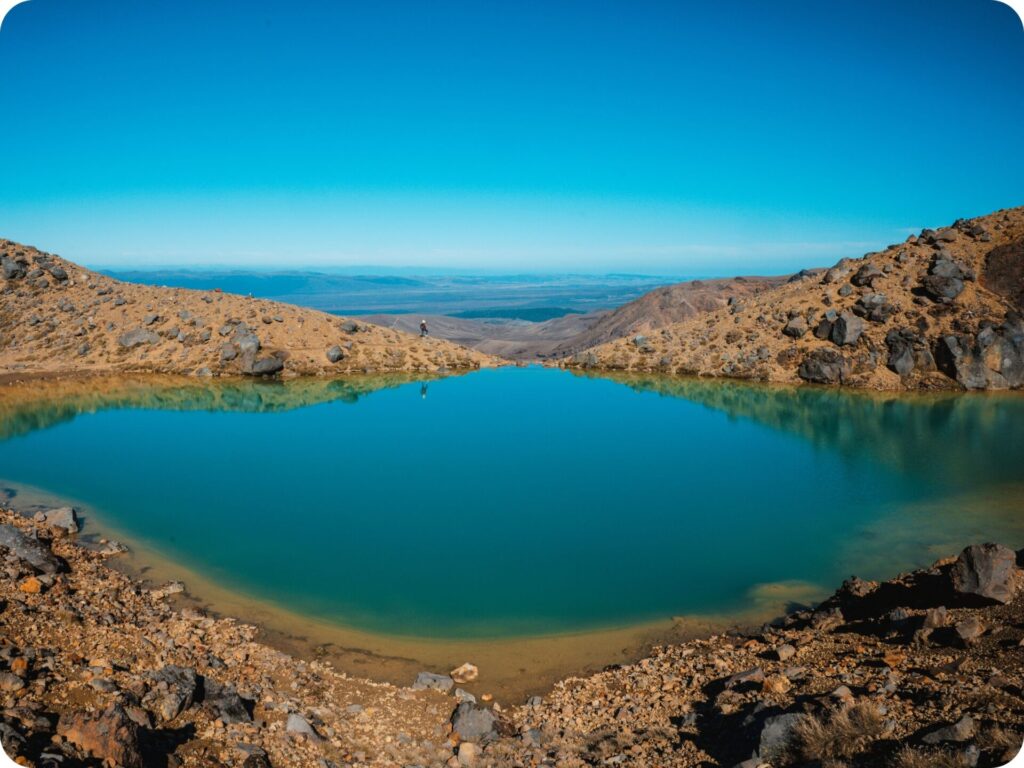
Aka Re Wai-whakaata-o-te-Rangihiroa (Blue Lake)
The name of this lake translates to Rangihiroa’s Mirror. When you see the reflective surface of the lake, you’ll understand why. At the shores of the lake, you might be tempted to stop for a snack.
Whilst it’s a prefect place to sit and take in the views, please don’t eat here as the lake is tapu (sacred). The track follows the curve of the lake before peeling off for one last little incline before the long descent of the track begins.
Te Maari Craters
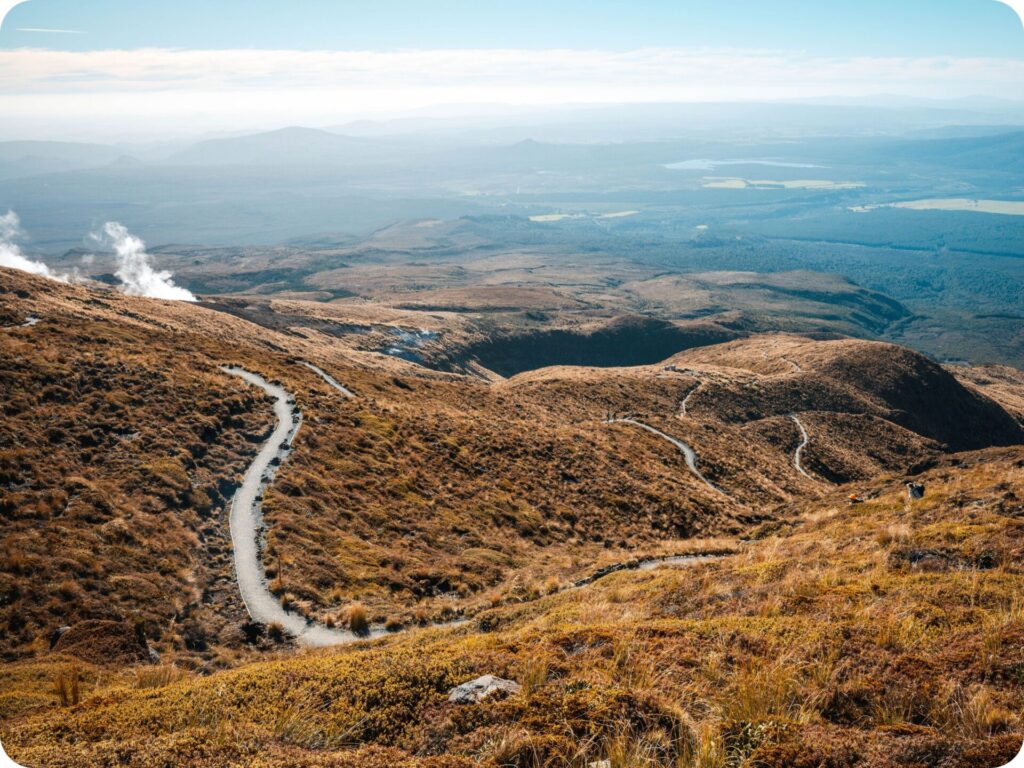
Just after the lake you’ll find some more toilets with an incredible view out over the valley. On a clear day, you’ll be able to see all the way out to Lake Taupō. These stunning open views will stay with you for most of the descent down to the car park.
As you continue to walk down you’ll come across the Te Maari Craters, the most recent volcanic activity in the park dating back to 2012. This is a stark reminder that you are hiking through an active volcanic landscape and another eruption is, indeed possible whilst you are on the track. Thankfully, the 2012 eruption happened during winter, no one was staying in the hut destroyed by rocks flung out of the Te Maari steam vent.
From here the track continues in a steady descent with a few switch backs and a volcanic stream crossing. Just before you enter the bush line, there is another set of toilets, the last you will encounter before the end of the trail.
Lahar Zone
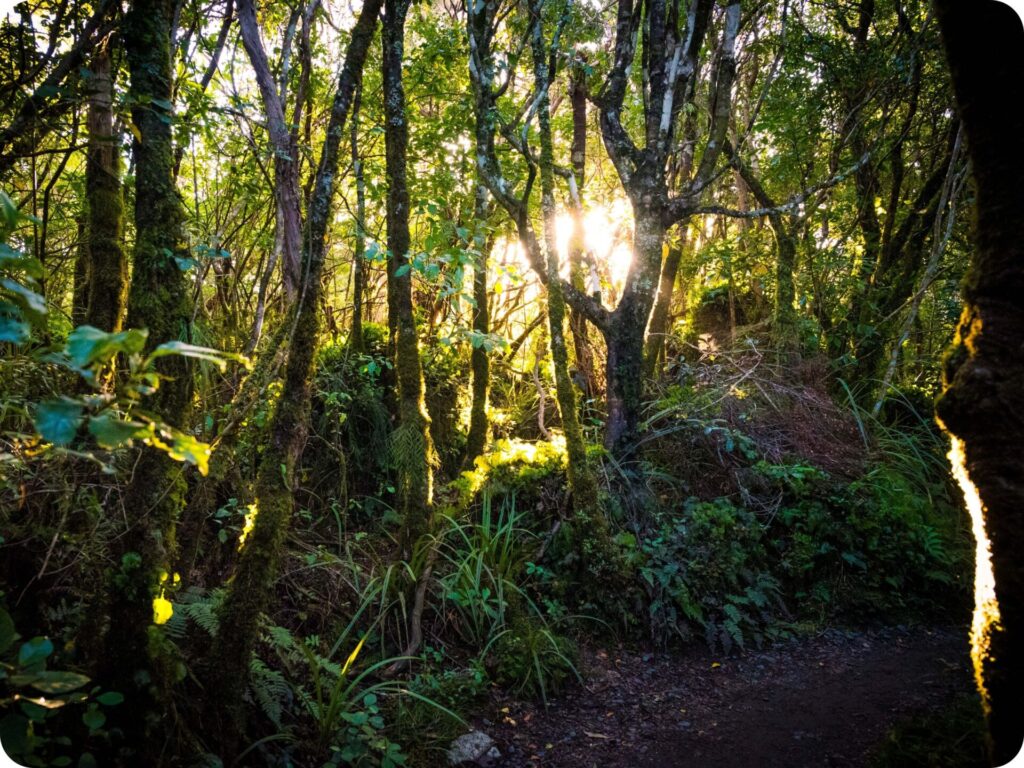
Plunging into the bush after hiking through the arid volcanic landscape is quite the shock to the senses. The trees appear even greener after walking through so much rock and red volcanic sand. It’s almost hard to believe this lush forest is part of the same country, let alone on the same hiking track.
The trail continues its steady downward descent and unfortunately for Nathan, this was where his knee decided it had definitely had enough of walking down hill. We slowed right down on this section of the track and even missed the side trail for Ketatahi Falls.
The track takes you across some boardwalks with signs telling you not to stop for risks of a Lahar. This is a volcanic mudflow, and you can still see signs of the previous one in all the mud surrounding the river and trees. After crossing the lahar zone, it’s a short walk out to the end of the trail.
End of the Trail
Once you make it to the Katetahi Road carpark at the end of the trail, you’ll have a few different ways to leave the park. Either you have a set time, the shuttle will be picking you up from this car park and all you need to do is sit and wait for your ride. Or you will have parked in the secure car park about 10 mins walk down the road, which you will need to continue on walking to.
Or you might be incredibly lucky, like we were, and one of the park rangers may take pity on you, offering to drive you that last 10 mins back to your car!
Nathan was limping pretty badly by the end of the hike, which is why we got offered a lift back to our car. We were so incredibly thankful to the park ranger who was so kind, and had some great chats with us as he drove us right to the door of our van!
That small act of kindness made a world of difference to Nathan, it lifted his spirits after the hard trek downhill with a sore knee, making a very happy end to our day rather than dwelling on the rather sore last few kms of the hike.
Extra Tips/Info for Tongariro Alpine Crossing
This one is a full day hike, so make sure you pack yourself plenty of food, water and gear to get you through any sudden weather changes. A raincoat is a must on any hike in Aotearoa as the weather can change suddenly here.
Alpine hikes like this one take a little extra planning.
Check on the DOC website or head to the visitors centre in National Park to get some helpful safety info on how to pack for these harsh alpine conditions.
There are toilets along the trail, but you will need to pack some toilet paper to use them. There isn’t anywhere to fill up water after the trail starts, so be extra aware of your water needs when packing. The streams and lakes here are sacred and not to be touched. They are also volcanic and not safe for drinking.
Look out for each other on the trail and make sure you are prepared or the alpine conditions.
Please Leave No Trace
As always, when out in nature, be sure to practice leave no trace. Anything that goes into the park with you comes out as well (this includes apple cores and any type of food scraps, wrappers etc). Be sure to keep to the trails so you don’t disturb the fragile ecosystems off the trail and leave rocks, sticks and plants as you find them. Please don’t take anything but photographs and leave with nothing extra but memories.
We like to go one step further with leave no trace by making sure we pick up any rubbish we see along the trail, sometimes people slip up and forget to pick up after themselves or things get accidentally forgotten. If you see something that doesn’t belong and are equipped to pick it up and correctly dispose of it, please do!
On our Tongariro hike we picked up eggshells, lolly wrappers, a couple corners from protein bars, a peach pit, some lip gloss that someone must have dropped and a forgotten water bottle.
To help you leave no trace on these incredible day hikes, we have a few blog posts for you to read! We share our tips on how to pack for an eco-conscious day hike and what to do on the trails to protect the land you are hiking on. It’s always good to know whose land you are on, too! We’ve provided that here, to the best of our knowledge, but recommend you do your own research too, making sure you respect the wishes of the traditional owners of the land is really important to protecting the land you are visiting.
Keen for more inspo? Be sure to check out:
- Day Hike – Pouākai Crossing
- The 6 Best Longer Walks in Nelson/Tasman Region
- 6 Unmissable Short Walks in Waikato