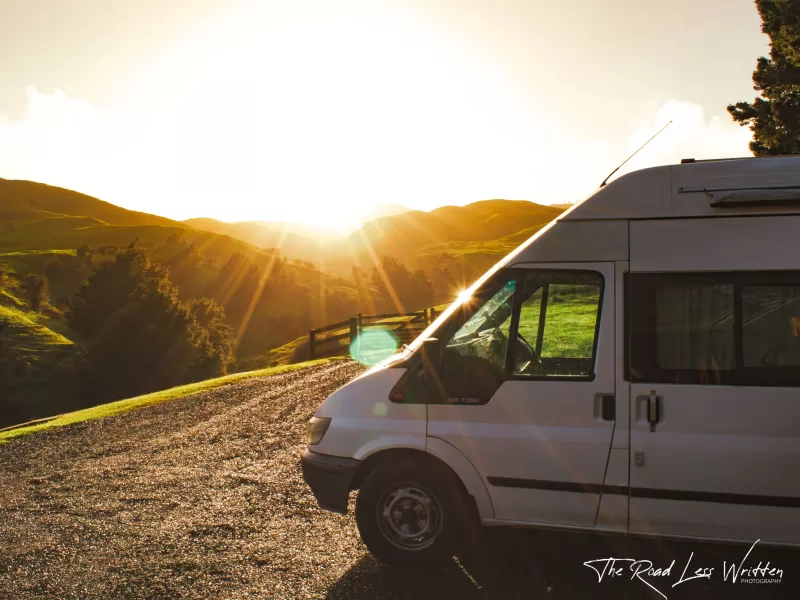
Vanlife in New Zealand is one of the most popular and common ways to travel slowly around Aotearoa. To buy a secondhand van and live the vanlife dreams that freedom camping offers. Plenty of tourists and kiwis alike travel the country this way, even if they don’t live permanently in their vans like we do.
Before we came over here and gave vanlife a go, we did a lot of research trying to figure out how much we needed to save to afford a van. Not really a straightforward question to find answers to, though. I mean, it’s like asking how long is a piece of string? There are so many things to factor into the equation when deciding what van to get and thus finding out how much said van might cost you.
We would have loved to have someone else’s start to vanlife journey broken down for us. So here is our vanlife journey from figuring out what we wanted in a van. All the way through to when we finally hit the road, and how much it cost to get there.
Be sure to check out our Instagram to see our best vanlife adventures!
What do you Want in your Van?
Before you start Vanlife in New Zealand, you need to have some idea of what kind of van you are looking for. Luckily, this is the easy part! Get searching through Instagram and Pinterest for some #vanlife inspiration! We’ve made a board on Pinterest for Vanlife Layouts and Aesthetics that she loved and wanted to incorporate into our van once we got it. This inspiration ALWAYS included a bookshelf. Get scrolling and dreaming away so you can come up with what you would like to have in your own van.
Our list of must haves and considerations is below:
Must have:
- It must be a high top van that we can stand up in. Not a pop top though as it’s too cold in New Zealand for this during winter.
- A gas burner and gas locker.
- A kitchen that can be used inside the van without opening doors ect. So we could cook in all kinds of weather.
- Solar power and ability to charge all our appliances without needing to pay for power at camp sites. This meant having an inverter so we could charge our laptop and camera.
- Permanent bed and separate seating area. We didn’t want to have to make our bed from our seating area every night.
- Self containment so we can freedom camp with fewer restrictions.
Should have:
- The ability to charge batteries whilst driving and through solar
- A proper fridge, not a camp fridge. We wanted a fridge that was more like a bar fridge than an esky. (or chilly bin for our kiwi demographic)
Not so important:
- Fixed permanent toilet, we were happy to have the toilet tucked away somewhere. We didn’t really plan on using it much, so figured it didn’t need a fixed position in the van and could be brought out of storage when needed.
- Shower. We really weren’t worried about not having a shower. In fact, we thought this would take up too much space and didn’t really want one.
This was our initial thoughts on what a van needed to have BEFORE we got a van and lived in one full time. Now that we have spent more than a year living in two different vans (a long story for another time) we’ve changed our stance on the toilet situation and the need for your batteries to be charged whilst driving and from your solar. You NEED both these things. For more vanlife must haves check out this blog post.
How to Find a Van to Buy and What to do Before Buying it
This is the hard part, finding a van that fits exactly what you want for the price you want. First, you need to decide on what the absolute most you’re willing to spend on a van will be. We decided that if we found the perfect van, as in it needed no work from us to be exactly what we wanted, then we would pay up to $50,000 for it.
This then meant that if we found a van that didn’t quite meet our requirements, but we could renovate it, to bring it up to our standards, it needed to be less than $50 000 to fit into our budget. Ideally, though, we didn’t really want to spend more than $40,000 on a van at all. We just figured it was better to have some of our budget leftover for emergencies than spending it all on the van and running into trouble later on down the road.
So going into it, we already had a budget of $40,000 in mind with the ability to stretch it further if the perfect van came up. Sadly, the perfect van didn’t come up. We found quite a few vans that would work for us, but most of them didn’t pass our tests. What tests are these? Before we would buy a van, we wanted it to pass a pre-purchase inspection. We also required it to get a new WoF, but that’s a legal requirement of selling a vehicle in New Zealand, anyway.
We recommend ALWAYS getting a pre-purchase inspection and in hindsight we’d say to always get that done with a big reputable company like AA and to ALWAYS get paperwork for that inspection. We didn’t get any paperwork from Trev’s inspection, which at the time seemed fine given we’d had an in-depth discussion with the inspector over the phone, but it’s come back to haunt us now. So please learn from our mistakes and get paperwork for absolutely everything. If the pre-purchase inspection came back with any serious issues or things that could become serious issues in a year or two, we passed on the van.
In order to find these vans we used, Facebook marketplace and Facebook groups such as New Zealand motor home and camper-van groups and trade me.
- Vans/ Campervans Buy Sell & Swap NZ
- Motorhomes Campervans for sale New Zealand
- New Zealand 🇳🇿 Car Market and Campervans for Backpacker / Traveler
- TradeMe
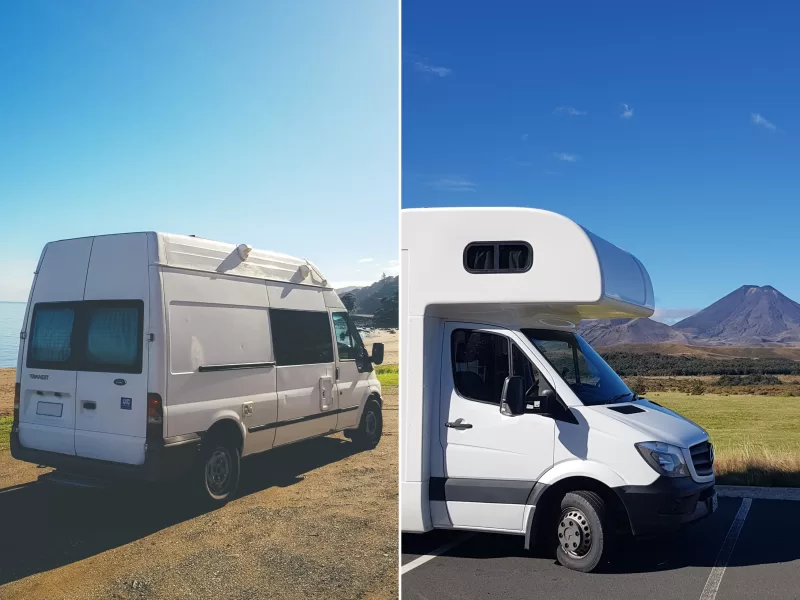
There are also second hand vans and motor homes available from RVSuperCentre if you have a slightly higher budget and don’t mind having a prefab rental build. These are easy enough to add your own flair to with bedding and some well-placed wall decorations though, so don’t let the prefab build put you off too much; especially as these vehicles often come with warranties and guarantees on their quality, something you won’t get from a private seller.
Our second van has come from RVSC and whilst it had a few issues and took forever to be ready for us, it’s served us much better than our first van. If you want more peace of mind, then go with a dealership and not a private sale.
In the end, we purchased Trevor for $29,000, coming in well below the $40,000 budget as we had some work to do on him and wanted at least $5,000 to remain in case we hit any bumps with him mechanically whilst we were travelling. He’s a 2004 van making him an 18 years old. The fit out was ok but not ideal. The bed wasn’t long enough for us to sleep in stretched out. He had a fixed toilet and there was no bookshelf nor a proper fridge. We had some work to do to turn Trev into our dream van.
Planning Out Our Renovations to the Current Van Build.
This will, of course, be very different for everyone based on what you have in your van and what you want from your van. In a perfect world, the van you purchase is exactly as you want it to be and you don’t have to do any work on it. Or you decide to stick with what you got and only change small things in which case you can skip down to making your van your home. But for those not so lucky *cough* US *cough* this is where you fix your purchased van to become your dream van.
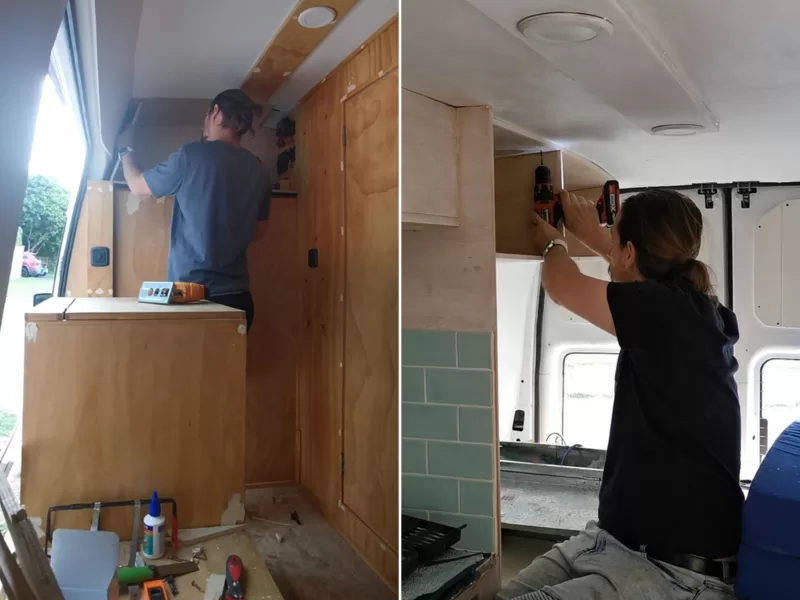
Make a plan and stick to it as best you can. We spent many a night nutting out how we could make Trev work for us before we purchased him. Indeed, we had plans for how to fix several vans that were on the market before we ended up going with Trev. Luckily, Nathan is a carpenter and knows what he is doing with this kind of thing.
Our Plans for Trev:
- Add two cupboards above the bed to create more storage for our clothing. We continued these on from the kitchen section of Trev to ensure we still had an open area on one side of the bed to allow us to sit upright against the wall.
- Create a bed extension so we could lie extended in bed at night and push the end away during the day to have our seating area and table accessible.
- Put a bookshelf in above the divider for the front seating to make more use of the above seating head space where the batteries are stored.
- Replace the carpet coverings on the doors with white wood boards
- Remove microwave and shelving for microwave to put in drawers for better storage
- Tile the splash back instead of having gross brown laminate
We then calculated the cost of the materials needed for these renovations, added an extra $500 to be safe and made sure we could complete it in the time frame required. This equated to an estimate of around $3,000 budget for renovations and an estimated 2 weeks to complete them in. Given when we were looking at Trev we’d have about a month to get this work done, we were pretty happy with this timeframe.
Interior design: Making Your Van Your Home
This is the fun part! How to give your van the right vibes for your vanlife adventures. Tiff used Pinterest again to create a vanlife mood board of all the ideas and styles she loved in other people’s van builds. This helped, but it was hard to narrow down a particular style because we loved them all.
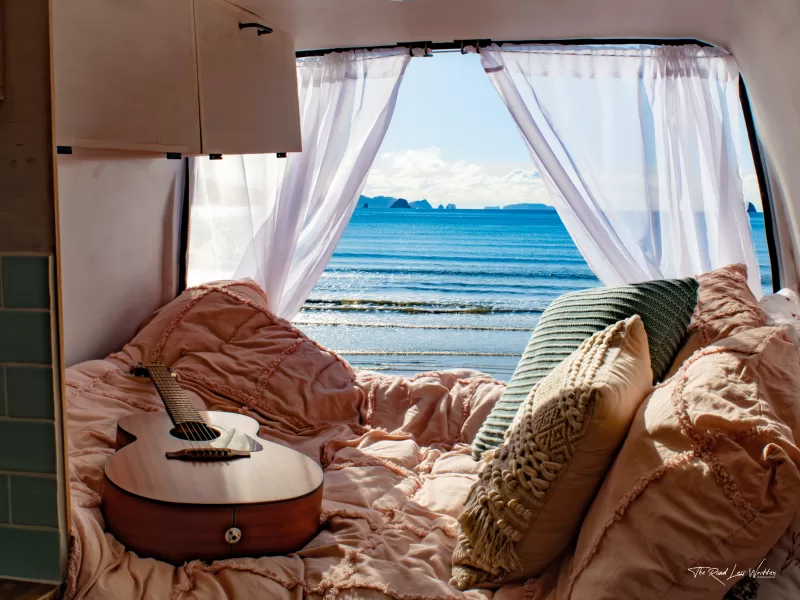
In the end, what helped her out the most was the first book she bought in Aotearoa. Greta and Valdin by Rebecca K Reilly. Tiff absolutely LOVED this book and has been lending it out to friends ever since she finished reading it. The cover is what turned into our inspiration for Trev. Pastel pinks and greens were our colour scheme. We decided that we would get rid of the brown wood finishes to Trev by white washing all the shelves and cupboards.
We then added the colour scheme of the book back into the van build with pops of colour in our seat cushions, tiled backsplash and our bedspread. We even had some T2 tea tins that fit the colour scheme and were proudly displayed on top of Tiff’s bookshelf. Add in some string lights down the van and we were done!
This all had a bit of a price tag on it, though, so it all depends on your budget. We wanted to get some of our things from second-hand shops to keep the cost down, but unfortunately we didn’t have any luck in that department. All in all, we spent roughly $1,800 on all the interior touches.
This included all our kitchen needs for cooking, our bedding, new foam for the bed and seats plus new covers for said foam, painting ect. Tiff managed to find the world’s thickest doona too, which was amazing at keeping us warm on chilly nights. We added sheer curtains to the back of the van and created block out insulation for the windows by cutting up a thermal sleeping mat we got from Kmart and sticking magnetic strips to them. We had plans to change the curtains to a better colour for our design, but never actually got around to doing this. We think we did a pretty good job!
Our Unplanned Detours

Everyone tells you how they go over budget and overtime on their van builds. Like literally everyone. So we built in a buffer on our budget and our time frame. Thank goodness we did because we got very close to going over budget and we did go past our time frame. This was through no fault of our own either, which makes it all the more frustrating. We hit a couple of speed bumps along the way with issues to the van electrics. Sadly, when buying second hand, this is a possibility and is the reason we made sure we had room in our budget for things to stop working.
During the time Nathan was working on the interior, we had the solar stop working. So we found someone to fix this and paid $2,000 to get it fixed. This set us back a couple days too. Not ideal, but Nathan was still pretty happy he would get it all done in time. A week after the first setback, the solar played up again and the central locking on the side sliding door stopped working. Back to the repair shop we went and a further $1,600 and almost a week later we had our van back and all fixed up.
These delays meant that we spent an extra 4 days over our time frame getting the van ready. Luckily there was plenty of room in our budget so we didn’t go over budget. We did still spend more than we wanted to though. Not ideal, but it wasn’t the end of the world. From experience, we say give yourself more time and money than you think you’ll need. Better to be finished early and under budget than wind up with not enough money or time left for your travels. For some more tips on what vanlife mistakes to avoid check out this blog post.
Final Cost of Vanlife in New Zealand
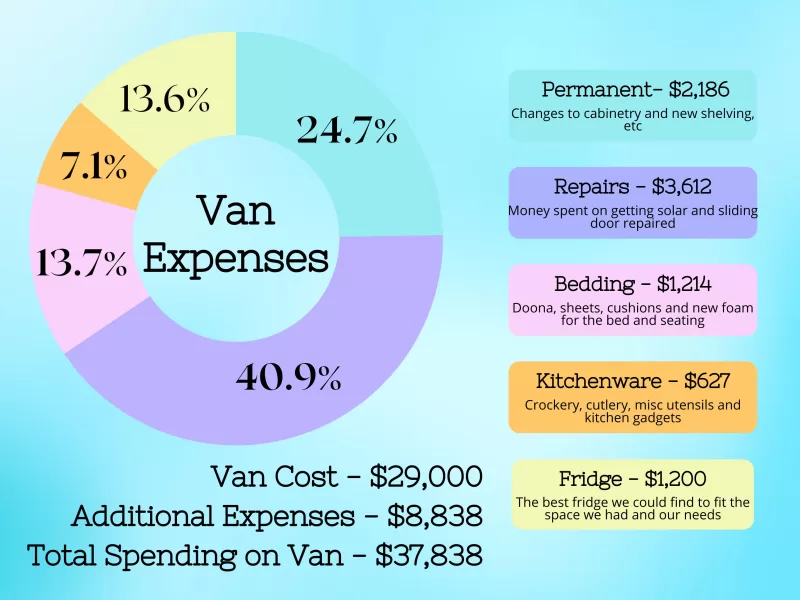
The ultimate cost of our van ended up being $37,838. We’ve included the breakdown here for you as well, to get a rough idea of where you could spend more or less on your own van. Finally, you’re probably wondering if we would do this again and what things we would change so you can learn from our mistakes a little more. We got incredibly unlucky with the van that we purchased and sadly after living in it for just a little over 2 months we found out it was riddled with rust and not roadworthy or cost/time effective to fix.
We are still dealing with the fallout of this over a year after having found the rust issues. To say it’s been a wild ride is an understatement. We’ll delve into that particular journey once it’s been closed in Disputes Tribunal. However, for now we’ll say that we won’t be buying a secondhand van from a private owner EVER again.
If we end up on another van project, we’d do it from the very start with a brand new van. However, that’s not really a practical option if you are only going to be using said van for a year or two in the country you are visiting. So our advice is to be ruthless in checking your vehicle before purchase, get it all in writing and spend less than your budget allows. Where you can, buy from a dealership that offers a warranty and has a reputation to uphold. That way, if something goes wrong, it’s an easier situation to deal with.
We truly loved living in Trev though, and we had some grand adventures with him. It devastated us when we found out how bad the rust situation was, especially given how much work we put into turning him into our home. Hopefully, you have much more luck with your own adventures vanlife in New Zealand.
Keen for more inspo? Be sure to check out:
- Don’t Make The Same Van Life Mistakes We Did!
- Campervan Essentials For Your Next Home on Wheels
- 4 Freedom Camping Apps to Make New Zealand Travel Simple!
Thank you so much for this. Hope you both have been well. I’ve only just discovered your blogs but I know they will help me for years to come.
Just a kiwi dreaming about vanlife!
Oh wow. Thanks Aimee!
We hope you can make that dream a reality! If you have any other questions, don’t hesitate to reach out.